
Roof replacement · Indianapolis, IN
When it's time, replace the whole system, once and right.
A roof replacement done well is decking verified, underlayment, flashing, ventilation, and shingles installed to work together, with a clear written scope before work starts. We recommend replacement only after a real on-site inspection, because that's the only honest way to know.
We replace roofs across Indianapolis and Central Indiana, including Carmel, Fishers, Noblesville, Greenwood and Avon.
What we look for
Roofs rarely fail in the middle of a shingle field. The weak spots are the details: caps, flashing, boots, fasteners, and edges. Select a numbered point to inspect it up close and see what our inspection checks there.
Caps ride the highest, windiest line of the roof, fastened through their own exposed nail line. Sealant dries out, nails back out, and storm gusts do the rest.
Flashing is metal and sealant working against masonry and siding, and it ages on its own schedule, not the shingles’. Counter-flashing pulls out of mortar joints; step flashing rusts or was never layered right.
Rubber pipe boots and vent seals bake in the summer sun and crack, often years before the shingles around them wear out. The most common leak source on otherwise healthy roofs.
Nails back out as the decking flexes through the seasons; each raised head tents its shingle or opens a direct path to the deck. Old sealant on exposed heads dries and splits.
Central Indiana hail bruises shingles, breaking the granule bond and sometimes cracking the mat, often without anything visible from the ground. The damage ages the roof invisibly.
Drip edges, first courses, and zones under tree lines wear ahead of the rest of the field. Edge details are also where wind gets its first grip on a roof.
Read all six failure points as plain text
- 01 · Ridge & hip caps
- Caps ride the highest, windiest line of the roof, fastened through their own exposed nail line. Sealant dries out, nails back out, and storm gusts do the rest. Signs: Rattling in storms · caps sitting proud or missing after wind. We check whether cap wear is isolated or the first visible sign of system-wide aging. The caps usually tell on the rest of the roof.
- 02 · Chimney & sidewall flashing
- Flashing is metal and sealant working against masonry and siding, and it ages on its own schedule, not the shingles’. Counter-flashing pulls out of mortar joints; step flashing rusts or was never layered right. Signs: Ceiling stains near the chimney · leaks that show up in wind-driven rain. We document every roof-to-wall and chimney joint: whether real step flashing exists or sealant was substituted, and what a complete replacement must rebuild here.
- 03 · Penetrations (vents & pipes)
- Rubber pipe boots and vent seals bake in the summer sun and crack, often years before the shingles around them wear out. The most common leak source on otherwise healthy roofs. Signs: Leak tracking along a bathroom or kitchen vent line. We count and photograph every penetration and boot. In a replacement, all of them are renewed, sized to the actual count from the inspection.
- 04 · Exposed fasteners & nail heads
- Nails back out as the decking flexes through the seasons; each raised head tents its shingle or opens a direct path to the deck. Old sealant on exposed heads dries and splits. Signs: Pinhole leaks with no obvious source · rust streaks below a spot. Fastener evidence tells us how the existing roof was installed, and it’s why correct nailing to the manufacturer’s spec matters so much on the new one.
- 05 · Hail impact zones
- Central Indiana hail bruises shingles, breaking the granule bond and sometimes cracking the mat, often without anything visible from the ground. The damage ages the roof invisibly. Signs: Dented vents or gutters after a storm · granules collecting at downspouts. We inspect slope by slope, up close, to tell scattered cosmetic dings from widespread impact damage. That distinction determines what the roof actually needs.
- 06 · Eaves, edges & isolated zones
- Drip edges, first courses, and zones under tree lines wear ahead of the rest of the field. Edge details are also where wind gets its first grip on a roof. Signs: Wear concentrated in one area · damp or stained fascia boards. We check the drip edge, starter course, and lap order at every eave and rake: small details that decide how the whole system handles water and wind.
Shingles vs. a complete system
New shingles nailed over old problems is how leaks come back in two years. A real replacement removes the old roof down to the deck, verifies the wood underneath, and rebuilds every layer, underlayment, water-protection membrane where it's needed, edge metal, flashing at every wall and pipe, balanced ventilation, and shingles installed to the manufacturer's exact instructions.
Why the inspection comes first
Nobody can honestly price a roof from the street, and nobody should tell you it needs replacing from a photo. We measure the roof, count every penetration, check flashing and ventilation, look for soft decking, and photograph what we find. Your recommendation comes from that evidence, and you see it too.
What affects your project
Every roof is different. The real variables: roof size and complexity (hips, valleys, pitch), decking condition, how many layers come off, flashing and chimney details, ventilation corrections, penetrations, access for tear-off and disposal, permits, and the shingle line you choose. A good proposal accounts for all of them up front.
Tear-off to ridge · a recent Indianapolis replacement
Every layer new, in order. These are the crew’s own progress photos from one of our replacements this month, the same ones that go into the homeowner’s closeout package.
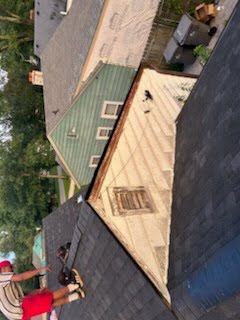
01 · Tear-off. Every old layer comes off, down to the wood. Nothing gets roofed over.
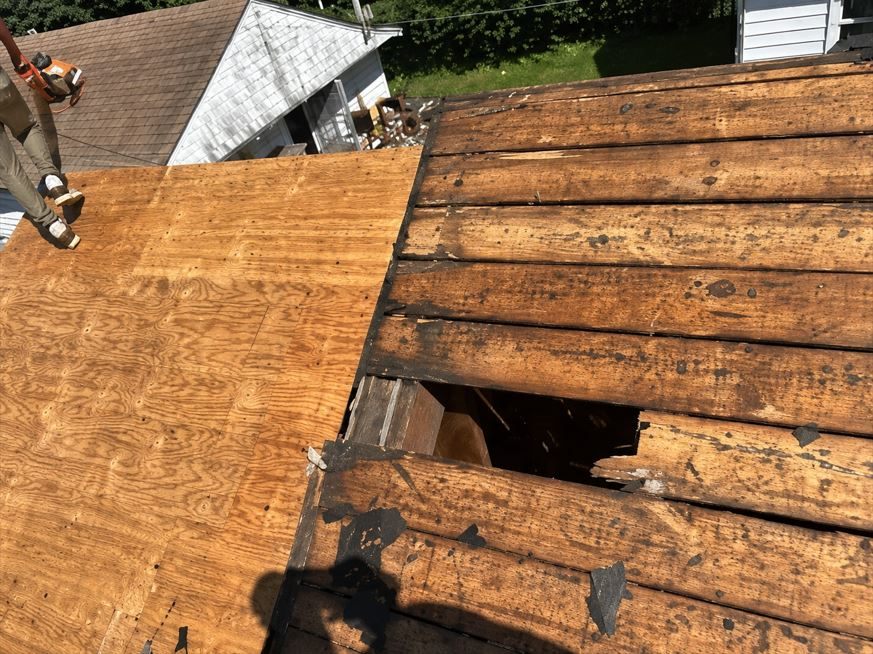
02 · Decking verified. Rotted plank sheathing with a hole clean through it. Photographed, priced at the per-sheet rate in the proposal, approved in writing, then replaced with new plywood (left) before a single layer went on.
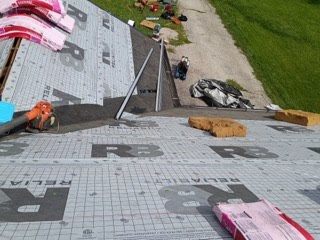
03 · Underlayment and membrane. Synthetic underlayment over the whole deck, self-sealing membrane where the valleys meet, shingles staged along the ridge.
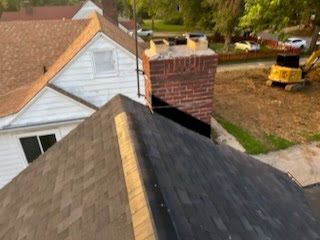
04 · Shingles, flashing, caps. Field laid, chimney flashed, caps on the ridge, and a walkthrough with the homeowner before it is called done.
When the deck looks like this
A repair stops being an option
The stage 02 photo, at full size. Water had been getting in for years, and the plank sheathing rotted until a section gave way. From the attic it was a stain; from the shingles, a soft spot. Nobody could have seen this without tear-off, and no shingle repair would have fixed it: the roof needed new decking under it before anything else was worth doing.
This is exactly what the hidden-condition rule in your proposal exists for. When the crew uncovers damage like this, work on that section stops. You get photographs of what was found, the number of sheets involved, and a written change priced at the per-sheet rate already in your contract. Nothing proceeds until you approve it in writing.
What you will never get from us is a deck like this roofed over, or a price for it invented on the day. The rule is set before the first shingle comes off, so the worst thing under your roof is still a conversation you were ready for.
Before and after
What a full replacement changes
Algae staining and worn shingles on one side, a complete algae-resistant architectural system on the other, from the same vantage point. Drag the slider to compare.


Pricing
What a roof replacement costs in Indianapolis
Most contractors will not answer this before they are standing on your roof. Here is our honest answer: most roof replacements we do land between $400 and $500 per square. A square is the roofing unit for 100 square feet of roof surface, so a 24‑square roof generally works out to somewhere around $9,600 to $12,000.
That is a range, not a quote, and we will not pretend otherwise. Where your roof falls inside it depends on the same things that decide the scope: pitch and complexity, how many layers come off, the condition of the decking underneath, flashing and chimney work, ventilation corrections, penetrations, and the shingle line you pick. Your actual number comes out of the inspection and gets written down in the proposal.
We work to stay as competitive as we honestly can. That means no padded markups and no invented line items — but it also means we do not win a bid by putting cheap material on your house or by underpaying the crew installing it. Good shingles, correct underlayment and flashing, and people who are paid fairly to do the work properly all cost what they cost. We would rather show you where the money goes than quote a number we have to claw back later.
Typical range
$400–$500
per square · 100 sq ft of roof
The inspection is free and comes first. You get the measured scope and one complete price in writing before you decide anything.
Want to work out your own number first? Our 2026 roof replacement cost guide walks through the math and the Indianapolis market rates.
Schedule a Free Roof InspectionYour written proposal spells it all out
Before you decide anything, you get one clear document that covers:
The exact scope
What's being replaced, the products going on (shingle line, color, wind rating), and where each system component applies.
Assumptions & exclusions
What the price assumes (like one existing layer) and what's deliberately outside the scope, written down so there's no ambiguity later.
Hidden-condition handling
How decking damage or other tear-off discoveries are documented, priced, and approved by you in writing before work continues.
Price, schedule & permits
One complete price, a realistic schedule window with its honest conditions (weather, materials), and who handles required permits.
Cleanup & quality checks
What "finished" means: documented quality checks during installation, full debris removal, magnetic nail sweep, and a walkthrough with you.
Warranty information
How workmanship and manufacturer warranty details are provided in your project documents at closeout.
What to expect, start to finish
BEFORE
Inspection, written proposal, your questions answered, materials ordered, schedule confirmed, and your prep list (cars out of the driveway, fragile items off shelves, hammering vibrates the house).
DURING
Property protection goes down first. Tear-off, decking check (with photos if anything needs your approval), then the system goes on in the right order. Most replacements take one to a few days depending on size, complexity, and weather.
AFTER
Complete cleanup and magnetic sweep, a final quality review, a walkthrough with you, and your project documents, including warranty information, in hand.
Wondering whether your roof is ready? Start with the inspection, not a guess.
Schedule a Free Roof Inspection