
Guide · Failure points
Why roofs leak: the six failure points every roof shares
Many residential leaks begin where the shingle field stops: at the joints, edges, and penetrations where three materials meet and one of them ages faster than the others. This guide walks the six points where leaks most often start, the physics that causes each one, and how to read a ceiling stain from inside the house.
A shingle field is a simple, redundant machine. Every course laps the one below it, water is always handed downhill onto another shingle, and there are thousands of square feet doing the same job the same way. Redundant systems are hard to break.
The details are different. A chimney is masonry moving at one rate, metal flashing moving at another, and sealant aging faster than both. A pipe boot is a ring of rubber asked to stay flexible through twenty Indiana summers. A ridge cap rides the windiest line on the house with its nail heads exposed. None of these have the field’s redundancy: when the one layer fails, water is inside.
That is why a good inspection spends most of its time at the edges and joints, and why “the roof looks fine from the street” means very little. The street shows you the field. The failures live where the field stops.
The six failure points, mapped
This is the same diagram our inspections work from. Select a numbered point to zoom in and see what fails there, what the early signs look like, and what a proper fix involves. The rest of this guide explains the forces behind each one.
Caps ride the highest, windiest line of the roof, fastened through their own exposed nail line. Sealant dries out, nails back out, and storm gusts do the rest.
Flashing is metal and sealant working against masonry and siding, and it ages on its own schedule, not the shingles’. Counter-flashing pulls out of mortar joints; step flashing rusts or was never layered right.
Rubber pipe boots and vent seals bake in the summer sun and crack, often years before the shingles around them wear out. The most common leak source on otherwise healthy roofs.
Nails back out as the decking flexes through the seasons; each raised head tents its shingle or opens a direct path to the deck. Old sealant on exposed heads dries and splits.
Central Indiana hail bruises shingles, breaking the granule bond and sometimes cracking the mat, often without anything visible from the ground. The damage ages the roof invisibly.
Drip edges, first courses, and zones under tree lines wear ahead of the rest of the field. Edge details are also where wind gets its first grip on a roof.
Read all six failure points as plain text
- 01 · Ridge & hip caps
- Caps ride the highest, windiest line of the roof, fastened through their own exposed nail line. Sealant dries out, nails back out, and storm gusts do the rest. Signs: Rattling in storms · caps sitting proud or missing after wind. We check whether cap wear is isolated or the first visible sign of system-wide aging. The caps usually tell on the rest of the roof.
- 02 · Chimney & sidewall flashing
- Flashing is metal and sealant working against masonry and siding, and it ages on its own schedule, not the shingles’. Counter-flashing pulls out of mortar joints; step flashing rusts or was never layered right. Signs: Ceiling stains near the chimney · leaks that show up in wind-driven rain. We document every roof-to-wall and chimney joint, then rebuild the failed one with real step and counter-flashing, layered into the courses, not another bead of sealant.
- 03 · Penetrations (vents & pipes)
- Rubber pipe boots and vent seals bake in the summer sun and crack, often years before the shingles around them wear out. The most common leak source on otherwise healthy roofs. Signs: Leak tracking along a bathroom or kitchen vent line. A failed boot is replaced and lapped correctly, under the shingles above and over the shingles below. While we are up there, we check every other penetration so one repair visit covers them all.
- 04 · Exposed fasteners & nail heads
- Nails back out as the decking flexes through the seasons; each raised head tents its shingle or opens a direct path to the deck. Old sealant on exposed heads dries and splits. Signs: Pinhole leaks with no obvious source · rust streaks below a spot. Backed-out fasteners are reset in the nail zone and the affected shingles resealed or replaced, so the fix holds through the next freeze-thaw cycle instead of reopening.
- 05 · Hail impact zones
- Central Indiana hail bruises shingles, breaking the granule bond and sometimes cracking the mat, often without anything visible from the ground. The damage ages the roof invisibly. Signs: Dented vents or gutters after a storm · granules collecting at downspouts. We inspect slope by slope, up close, to tell scattered cosmetic dings from widespread impact damage. That distinction determines what the roof actually needs.
- 06 · Eaves, edges & isolated zones
- Drip edges, first courses, and zones under tree lines wear ahead of the rest of the field. Edge details are also where wind gets its first grip on a roof. Signs: Wear concentrated in one area · damp or stained fascia boards. We check the drip edge, starter course, and lap order at every eave and rake: small details that decide how the whole system handles water and wind.
The stain is not under the hole
Before walking through the failure points one by one, it helps to understand the single most confusing thing about leaks: water rarely comes straight down. It enters at a failed detail, then travels. It runs down the underside of the decking, follows the slope of a rafter, rides the top of the underlayment, and keeps moving until something gives it a reason to drop: a nail point, a seam, a low spot.
Only then does it land on your insulation or drywall, soak in, and appear as a stain. By that time it can be many feet downhill from where it actually got in, and on a complex roof it can be on a different slope entirely.
Figure 1 · How a leak travels before you see it
A leak has two addresses: where the water shows and where it enters. Every failed repair we get called to redo fixed the first one.
This is also why a real diagnosis works uphill. Starting at the stain, a competent inspector traces the possible paths upslope and checks every detail along them: boots, flashing, fasteners, laps. The entry point is nearly always a detail from the map above, sitting somewhere on that uphill line.
Sun and heat, the slow killer
Nothing on your roof is destroyed by sunlight faster than the parts that flex. Asphalt shingles are protected by their granules, which exist largely to shield the asphalt beneath from ultraviolet light. Rubber and sealant get no such shield.
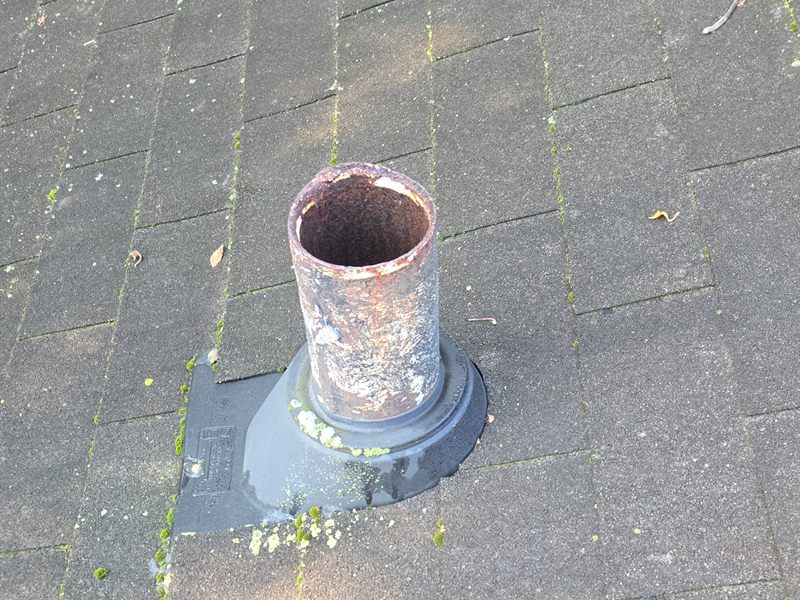
The clearest example is the neoprene pipe boot: the rubber collar sealing each plumbing vent. It bakes in direct sun all day, every day. The rubber stiffens, surface cracks appear, the cracks deepen, and eventually the collar splits or pulls away from the pipe. Roofing sources widely rank failed pipe boots among the most common residential leaks, and the commonly quoted service life of a standard neoprene boot is roughly 10 to 15 years, with south- and west-facing boots aging fastest.
Exposed sealant fails the same way on a shorter clock. Any place a past roofer solved a flashing problem with a bead of caulk is a place with a maintenance schedule nobody wrote down: the sealant dries, shrinks, and splits, usually within 5 to 10 years, often sooner on the sunny slopes.
Photo 1 · A pipe boot at the end of its clock
Shade does the opposite, and it is not better
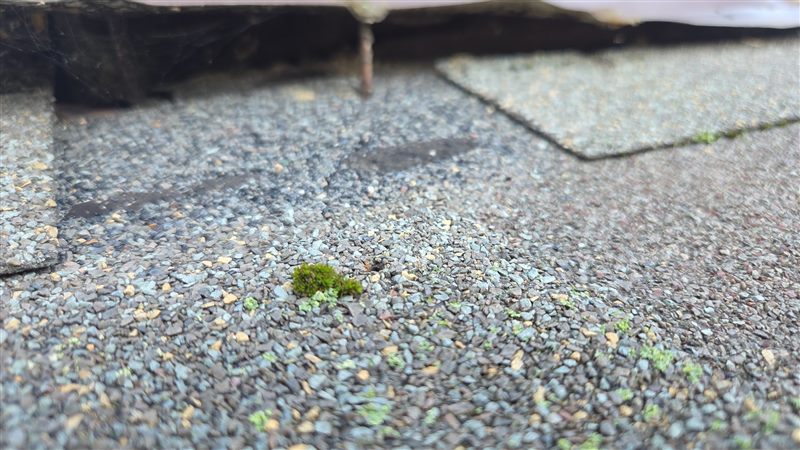
The slope that never sees the sun has its own problem. A north-facing field, or one under a tree canopy, dries slowly after every rain, and anything that stays damp on a roof eventually grows. Moss and lichen are not just cosmetic: their roots work down between the granules, hold water against the asphalt through every freeze-thaw cycle, and lift the granules loose as they grow. The shingle ages from the surface down, on a slope that would otherwise have been the longest-lived part of the roof.
Photo 2 · What a shaded slope grows
Heat also works from below
A poorly ventilated attic cooks the roof from underneath. Without enough intake at the soffits and exhaust at the ridge, summer attic temperatures climb far above the outside air, and that heat accelerates the aging of the shingles above it: the asphalt dries, the mat gets brittle, and the sealant strips between courses weaken ahead of schedule. Two identical roofs, one ventilated and one not, do not reach old age together.
This is the least visible failure cause on this list, because it does not produce a leak at a point. It shortens the life of the whole field. It is also why a serious inspection looks inside the attic, not just at the surface.
Water’s other two ways in
Gravity is the failure mode everyone pictures: a hole, a drip. But shingle roofs are designed to shed gravity-fed water almost indefinitely. The leaks that surprise people use water’s other two tricks.
Wind-driven rain moves sideways and uphill
A hard storm pushes rain horizontally, and pressure differences can drive it upward under laps that shed falling rain perfectly. This is why some leaks appear only in certain storms and never in ordinary rain: the failure point, often aging step flashing at a sidewall or a lifted shingle edge, only admits water when the wind points at it. If your stain has a weather pattern, tell your inspector. It is a diagnostic clue worth more than a photo.
Ice dams make the roof hold water it was never meant to hold
Central Indiana winters produce a failure mode that has nothing to do with the roof wearing out. Heat escaping the house warms the roof deck and melts the underside of the snow above it. That meltwater runs down the slope until it crosses the eave, the overhang past the exterior wall, where there is no heated house below and the surface is cold. It refreezes there, and repeated cycles build a ridge of ice: a dam.
Figure 2 · The ice dam mechanism
The water pooled behind the dam sits on the roof and rises, and standing water defeats laps that shed moving water without effort. This is exactly why modern codes and good practice put ice-and-water membrane at the eaves: a sealed backup layer for the one zone where water is expected to stand. Building-science guidance is blunt about the root cause, though: air leaks and thin insulation in the attic drive the melt, so the durable fix is sealing and insulating the attic floor, not just armoring the eave.
If your leaks appear during winter thaws and your eaves grow thick ice and icicle curtains, you likely have an ice dam problem, and the roof surface may be perfectly healthy.
Wind and hail, the fast killers
Everything above works in years. Storms work in minutes, and they attack the two places the map flags: edges and the open field.
Wind starts at the edges
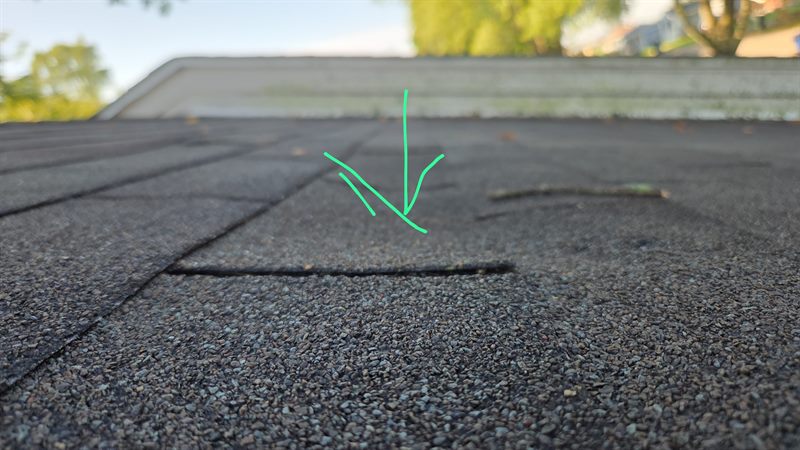
Wind does not push a roof apart; it lifts it. Air accelerating over the ridge and around rakes and eaves creates uplift, and the forces concentrate at the perimeter and corners of the roof, which is why storm damage so often shows up as lifted or missing shingles along an edge or a run of ridge caps while the center of the field looks untouched. Every lifted shingle also breaks its sealant bond, so a roof can look fine after a storm and shed water worse than it did before. Caps take it hardest: they ride the highest line on the house with exposed fasteners, which is why they are point 01 on the map.
Photo 3 · A lifted tab, marked during an inspection
Hail damages the roof invisibly
A hailstone rarely punches a hole. What it does is bruise: the impact crushes the granule bond and can fracture the fiberglass mat beneath, leaving a soft spot that sheds its granules over the following months. Each bare spot exposes the asphalt to the ultraviolet aging the granules existed to prevent. The roof does not leak the day of the storm. It ages several years in one afternoon, quietly, which is why hail assessment is done up close, slope by slope, and not from the driveway.
Granules collecting in gutters and downspouts after a storm are worth an inspection, not a conclusion. Some shedding is normal, especially in a new roof’s first months, and granules alone do not prove hail damage or imminent failure. What a sudden increase after a storm justifies is a close look, because if the granule loss is impact damage, the exposed asphalt underneath ages faster than most people expect.
Photo 4 · Hail bruising, from the slope and up close
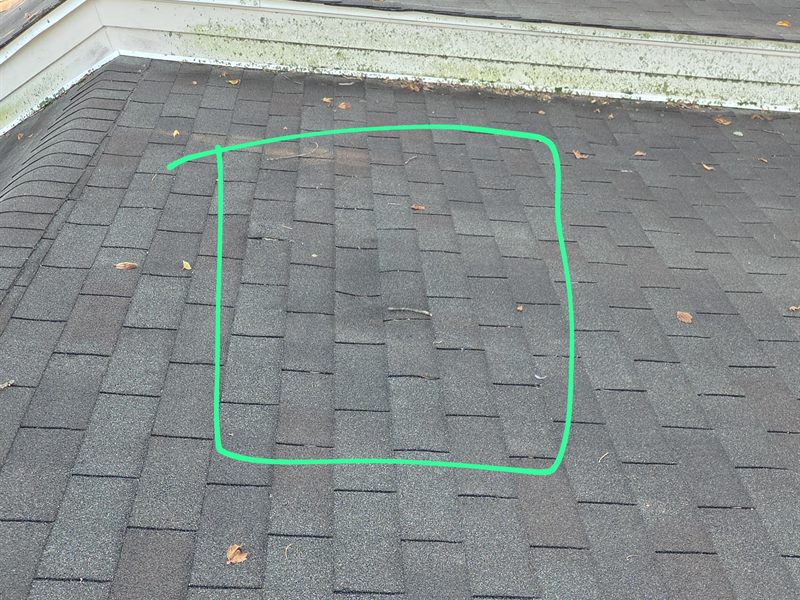
A test square marked on the slope. Inside the outline the inspector counts impact marks; the count per square is what an adjuster works from.
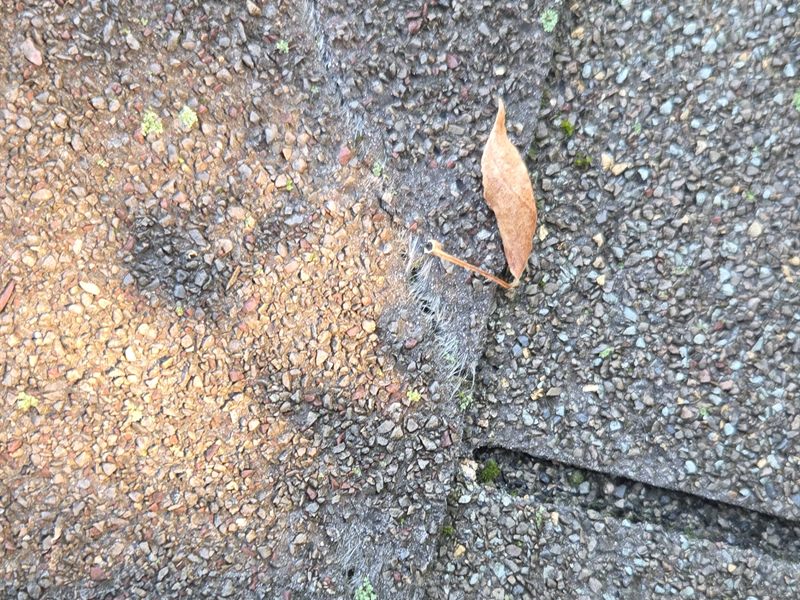
One impact, up close. The granules are gone, the asphalt is bare, and this spot now ages in the sun on a clock the rest of the roof is not on.
Failures that were installed, not weathered
A large share of the leaks we diagnose were not caused by weather at all. They were built into the roof on installation day and took a few years to announce themselves. Three patterns account for most of them.
Nailing outside the zone. Every shingle has a manufacturer-specified nail zone. Nails driven too high miss the course below and leave the shingle held by half its fasteners; nails overdriven by a hot compressor cut into the mat they are supposed to hold. Both mistakes are invisible from above and both surface years later as slipped shingles and wind losses that look like storm damage.
Sealant where flashing belongs. Step flashing at a sidewall and counterflashing at a chimney are mechanical systems: metal layered into the shingle courses so water is handed downhill by geometry. A bead of caulk substituted for that geometry works until the sealant dies, which as covered above is a 5-to-10-year proposition. If an estimate says “seal flashing” where it should say “replace flashing,” that difference is the whole repair.
Reused details on a new roof. Old drip edge left in place, original boots carried over, existing flashing roofed around. Every reused detail sets its own expiration date inside the new roof’s warranty period, and it is the most common reason a roof leaks at year three that should not have leaked before year twenty.
Photo 5 · Sealant doing flashing’s job
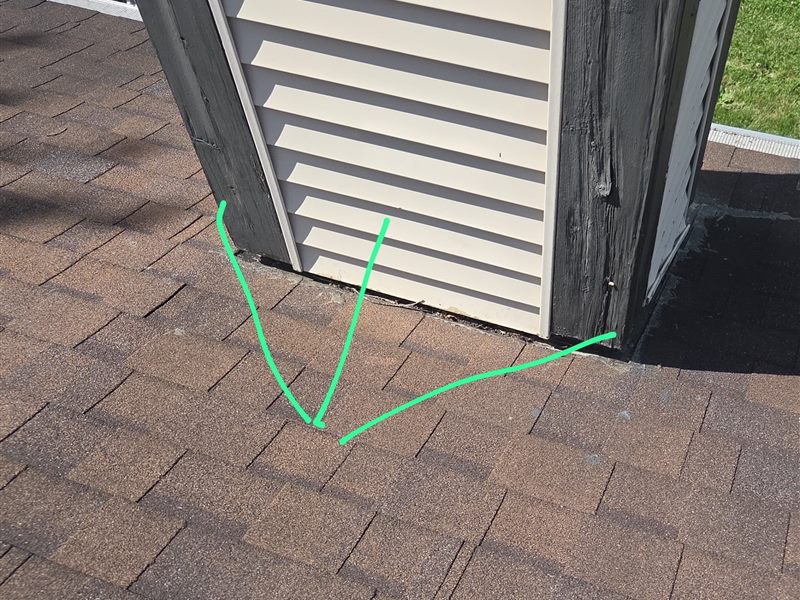
A chimney chase with no counterflashing to speak of. The green lines follow the gap where water has been getting behind the trim; the rot in the corner board is the tell.
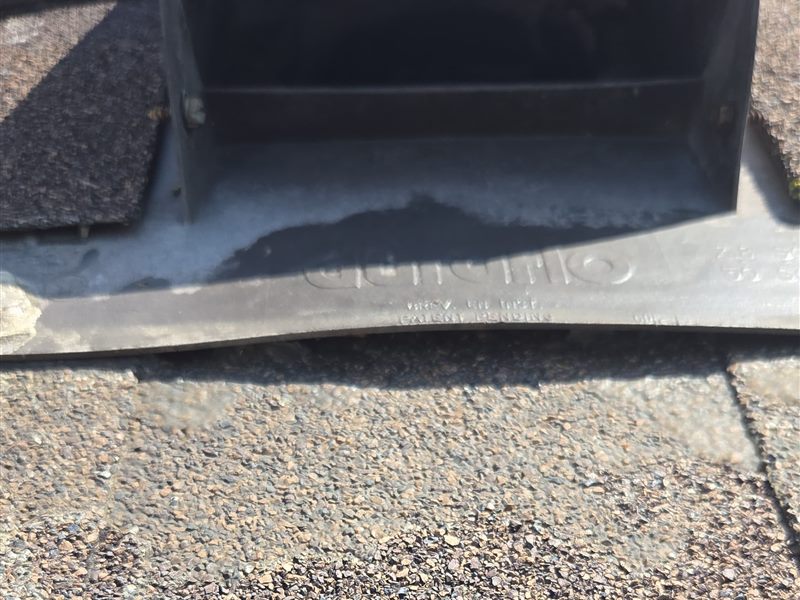
A vent flange set on top of the shingles instead of lapped under the course above, held by a smear of sealant that has already split. This is the 5-to-10-year clock, about halfway through.
Weather gets blamed for a lot of failures that were installed. The difference matters, because one is bad luck and the other is a pattern that will repeat.
Add the smaller human causes: satellite dishes lagged through shingles, holiday-light staples, foot traffic on hot shingles that scuffs granules loose. None are catastrophic alone. All of them are entries on the map waiting for the right storm.
The clock
What wears out when
A roof is not one component with one lifespan. It is a set of components on different clocks, and the leaks in a roof’s middle age come from the short-clock parts failing inside a long-clock field. Typical service ranges, not promises, and sun exposure moves every one of them:
Figure 3 · Component service life, typical years
Read the chart from the left and a maintenance rhythm falls out of it. In a roof’s first decade, problems are usually installation problems. In the teens, the short-clock components come due: boots, exposed sealant, the odd run of caps, all repairable for a small fraction of replacement cost. Past twenty, the field itself starts telling you things, and repairs shift from good investments to bridge financing.
This is also the honest frame for the repair-or-replace question. A cracked boot on a twelve-year-old roof is usually a straightforward repair. The same boot on a twenty-two-year-old roof with granule loss across the south slopes is a conversation about the next five years, and you deserve a contractor who will have that conversation with numbers instead of pressure.
Reading the symptom from inside the house
You cannot diagnose a roof from the living room, but you can narrow it, and a good description shortens every service call. Where a stain shows up, and when, points at a first suspect:
| What you see | Check first |
|---|---|
| Stain near the chimney | Counterflashing pulled from mortar joints, failed step flashing, or a saturated crown, in that order |
| Stain on a bathroom or kitchen ceiling | The pipe boot or vent seal on the roof above that room’s vent line |
| Leak only in hard, windy storms | Sidewall step flashing or a lifted shingle edge facing the weather |
| Leak only in winter thaws | Ice damming at the eaves, and behind it, attic air leaks and insulation |
| Small spot with a rust streak | A backed-out fastener or exposed nail head uphill of the mark |
| Granules collecting in gutters | Age or hail wearing the protective surface; worth an inspection, though some shedding is normal and not proof of failure |
| Damp or stained fascia boards | Drip edge and first-course laps at the eave, or a gutter problem imitating a roof problem |
Have a ceiling stain? We trace it to the entry point, photograph what we find, and put the fix in writing.
Schedule a Free Leak InspectionTwo habits make you a better witness. Note the weather when a stain appears or grows: rain, wind direction, thaw. And photograph the stain with something for scale, because “is it growing” is the single most useful question about any ceiling mark, and memory is a poor instrument.
And one caution in the other direction: not every ceiling stain is the roof. Condensation on cold ductwork, a bathroom fan venting into the attic, and plumbing above a ceiling all imitate roof leaks convincingly. A diagnosis that starts and ends on the shingles is not a diagnosis.
Photo 6 · Two leaks that were never the shingles
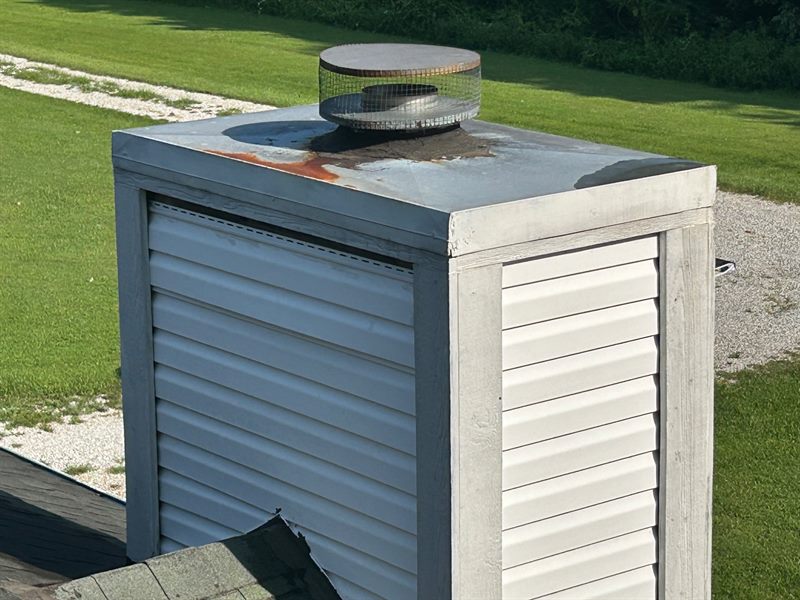
A “stain near the chimney” call. The shingles were sound; the chase cap had rusted through around the flue, which puts water inside the chase and on the ceiling below it.
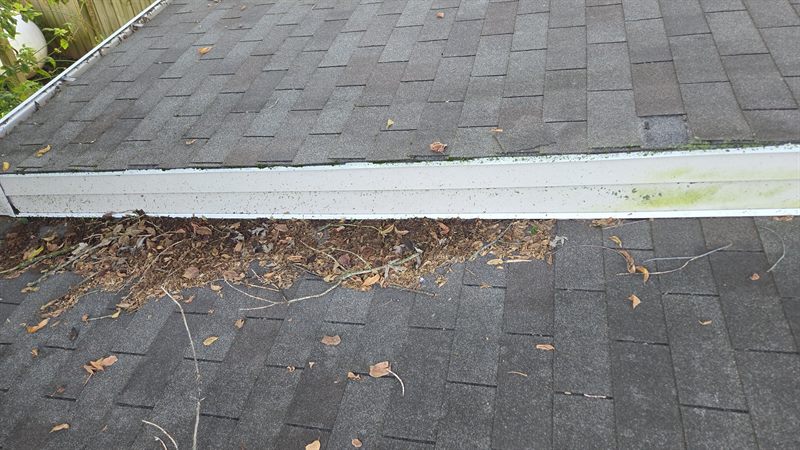
A “damp fascia” call. A gutter full to the brim backs water over its rear edge and onto the fascia in every heavy rain, imitating a drip-edge failure almost perfectly.
A leak is a diagnosis problem first
Everything above points one direction: the visible symptom and the actual failure are usually in different places, and often in different decades of the roof’s life. That makes the quality of the diagnosis, not the size of the patch, the thing that decides whether a repair holds.
A good diagnosis names the entry point and shows you the photo of it. It distinguishes a weathered failure from an installed one, because the second kind has siblings. It checks the other five points on the map while someone is already up there, since details age as a family. And it tells you honestly which decade of the chart your roof is in, because the right fix for a boot at year twelve and the right fix at year twenty-two are different answers.
If a contractor quotes you a fix without naming an entry point, you are buying a patch over a stain. The map above is what the alternative looks like.